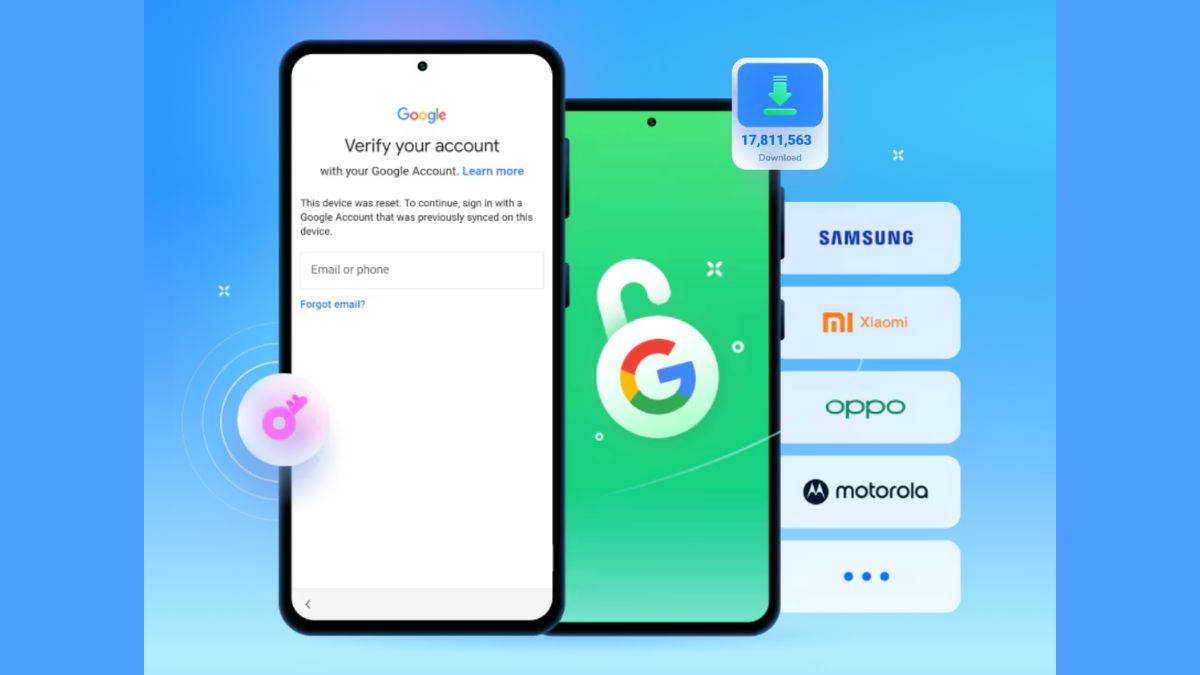
Gave your old Android phone to a friend or sold it online? It might be possible that the new owner got stuck on the Google verification screen after a factory reset. This is because of Factory Reset Protection (FRP), a security measure that Google added to Android 5.1 Lollipop to prevent thieves from using stolen or reset devices.
This article will help you prevent the FRP lock when selling or giving away your Android phone and explain how FRP bypass programs can solve problems when doing the setup.
What Exactly is FRP Lock and Why Does it Trigger?
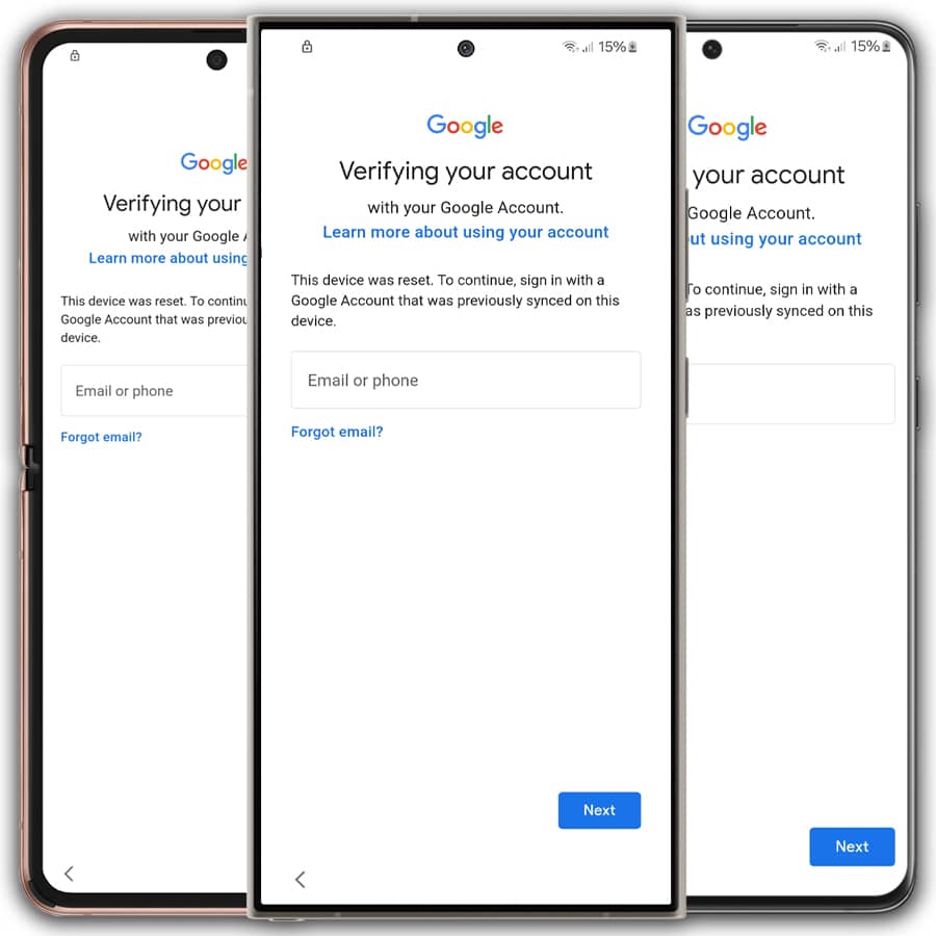
Factory Reset Protection (FRP) is a security feature which is automatically enabled when a Google account is signed in on an Android device. After a factory reset, this feature prevents the phone from being used unless the details of the last Google account to be synchronized are entered. This way, the device will only be used by the legitimate owner.
FRP is generally activated when a factory reset is done without first removing the Google account. On a lot of occasions, users that erase their phones by accessing the recovery mode or settings, think that they have removed everything, but the FRP lock is still associated with the original account. Consequently, the new user of the device will be stuck at the Google verification screen during the setup.
Pre-Transfer Checklist – The Only 100% Reliable Prevention Method
Step 1: Backup all your important data
For safety reasons, before resetting your Android phone, it is very important to back up your data such as contacts, photos, videos, files, etc. to either Google Drive, a PC or external storage. This way you won’t lose any data accidentally after the reset.
Step 2: Remove all Google accounts from the device
Navigate to Settings → Accounts and backup → Manage accounts and pick your Google account. Then click Remove account to get rid of it from the device. If you have several Google accounts signed in, remove each one separately.
In fact, this is the main step since the FRP gets deactivated automatically when all Google accounts have been removed.
Step 3: Disable “Find My Device” Administrator Privileges
Proceed to Settings → Security → Device administrators and disable Find My Mobile. This option relates to your Google account, and it may keep the FRP operative if not disabled prior to reset.
Step 4: Remove Screen Locks (PIN, Password, Pattern)
Open Settings, then Security, then Screen lock and pick None or Swipe.
Step 5: Perform a Factory Reset
On Samsung phones, head to Settings → General management/System → Reset Options → Erase all data (Factory reset). It is advisable to use this method as it guarantees a thorough cleaning of the device whilst properly syncing with the Samsung system reset process.
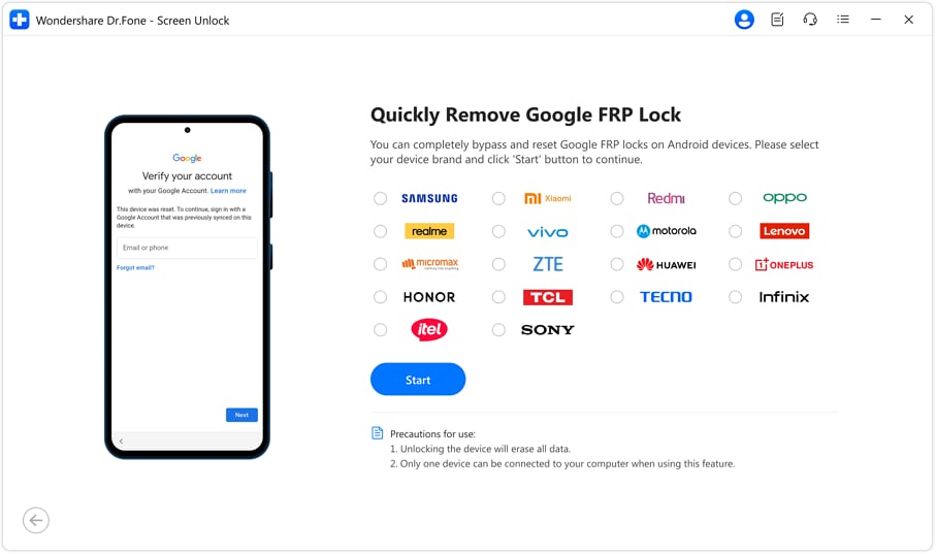
What if You Forgot a Step? – Solving FRP Post-Transfer with Dr.Fone – Screen Unlock (Android)
If a Google account or security setting is missed before reset, the phone may still get stuck on the verification screen due to FRP. In this situation, Dr.Fone Screen Unlock (Android) offers great help to get the device unlocked by walking through the steps for FRP removal after factory reset.
Besides that, it can bypass FRP on Android 15 to 17 devices with the help of AI, it can unlock phones from all major manufacturers such as Samsung, Xiaomi, Oppo, Vivo, Realme, Motorola, and more, and it also guides you step-by-step in unlocking your phone even if you don’t have any technical skills. Plus, it can bypass the Google account verification after reset, it supports Samsung devices running both normal and Snapdragon chipsets, and it sometimes provides the option of online FRP unlocking, which is why it is a very handy solution when setup errors cause FRP to be activated.
Step 1. Launch Dr.Fone and Connect Device
Open Wondershare Dr.Fone on your PC and connect your Samsung phone or tablet, then go to Toolbox > Screen Unlock.

Step 2. Select Android and FRP Option
Choose Android from the menu, then click Remove Google FRP Lock and select Device Brand > Start to proceed.
Step 3. Choose One-Click Removal Method
Select All Android Versions (One-Click Removal) and click Start to begin the FRP bypass process.
Step 4. Follow On-Screen Instructions
Enable Emergency Call menu, enter the code *#0#, allow USB debugging when prompted, and complete the process to remove the FRP lock successfully.
Mistakes to Avoid – Common Pitfalls
Mistake 1: Performing only a factory reset and not removing Google accounts beforehand will still leave FRP active on the device.
Mistake 2: Performing a reset via recovery mode (hardware keys) with Find My Device still enabled can cause Google verification to be triggered after reboot.
Mistake 3: Thinking that just logging out of the main Google account is sufficient, while other synced accounts have not been removed.
Mistake 4: Failing to give the new owner important documents such as proof of purchase or original account information in case of verification.
Mistake 5: Relying on illegal third-party unlocking tools or services may cause your device to catch malware or become unsecured.
Conclusion
It is simple to avoid FRP lock just to make sure to follow the correct steps before resetting your Android device. For instance, you may take out Google accounts, turn off security features such as Find My Device, and factory reset the device correctly so that the phone can be passed on without any verification issues.
Implementing these helpful tips can not only help you steer clear of FRP lock complications but at the same time, selling or giving away your device will be a smooth and hassle-free operation. And in case of an error, effective tools like Dr.Fone, Screen Unlock (Android) work very well to restore access and repair the problem.