Contouring is a makeup technique that can enhance your facial structure, creating the illusion of sharper cheekbones, a slimmer nose, and a more defined jawline. To master the art of contouring for your unique face shape, follow these expert techniques:
- Identify Your Face Shape: Before you start contouring, determine your face shape. Common face shapes include oval, round, square, heart, and diamond. Each face shape has specific areas where contouring can create the most flattering effects, so knowing your face shape is essential for achieving the desired results.
- Choose the Right Contouring Products: Select a contouring product that is one to two shades darker than your natural skin tone and has a matte finish. Cream or powder contouring products work well, depending on your preference and skin type. Avoid products with shimmer or glitter, as they can create an unnatural look.
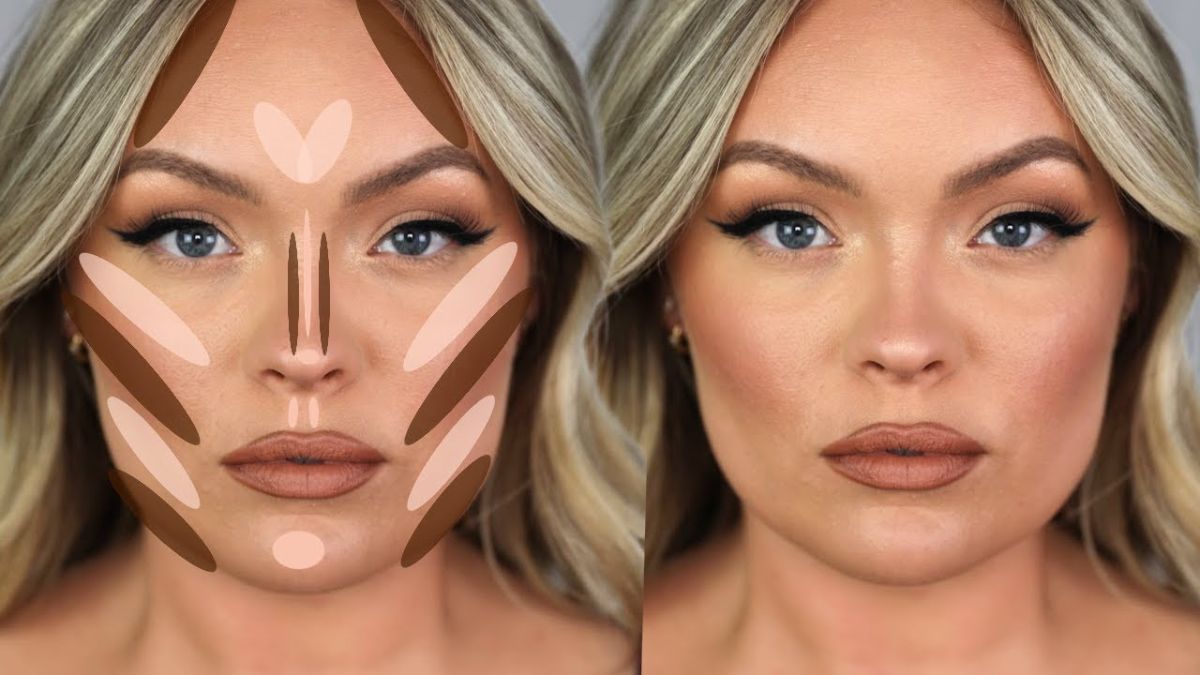
- Highlight High Points of Your Face: Before applying contour, highlight the high points of your face to create contrast and dimension. Use a lighter concealer or highlighter to brighten the under-eye area, bridge of the nose, center of the forehead, and cupid’s bow. This step will help balance the contouring and add luminosity to your complexion.
- Contour According to Your Face Shape:
- Oval Face: Apply contour along the sides of the forehead, under the cheekbones, and along the jawline to add definition and dimension.
- Round Face: Focus contouring on the outer edges of the face to create the illusion of angles and definition. Apply contour along the temples, under the cheekbones, and along the jawline, blending well to avoid harsh lines.
- Square Face: Soften angular features by contouring along the hairline, under the cheekbones, and along the jawline. Focus on blending to create a seamless, natural-looking effect.
- Heart Face: Contour the temples, under the cheekbones, and along the jawline to balance the wider forehead and narrow chin. Soften the chin area by applying contour along the jawline and blending downwards.
- Diamond Face: Contour the temples, under the cheekbones, and along the jawline to soften angular features and create a more balanced appearance.
- Blend, Blend, Blend: The key to natural-looking contouring is blending. Use a damp makeup sponge or a fluffy brush to blend the contour product seamlessly into your skin, focusing on softening any harsh lines and creating a gradual transition between the contoured areas and the rest of your face.
- Set Your Contour: To ensure your contour lasts all day, set it with a translucent powder or a contour powder that matches your skin tone. Lightly dust the powder over the contoured areas to lock the product in place and prevent smudging or fading throughout the day.
- Practice Makes Perfect: Contouring is a skill that takes practice to master, so don’t be discouraged if it doesn’t look perfect the first time. Experiment with different techniques, products, and intensities until you find what works best for your face shape and features. With time and patience, you’ll become a contouring pro in no time!
By following these contouring techniques tailored to your face shape, you can sculpt and define your features like a professional makeup artist, enhancing your natural beauty and confidence with every application. Remember to have fun experimenting with different looks and techniques, and don’t be afraid to customize your contouring routine to suit your unique preferences and style.
